
Got worms? Then you must be photographing in RAW with Fuji cameras and gotten suckered into a life-long relationship with Adobe’s Creative Cloud subscription model (just like me ;-) Don’t worry, you ain’t gotta take no nasty medicine anymore to get rid of them worms, coz I got good news for ya! Please read on if interested and join the discussion below in the comments …
The Hof Garden in Bayreuth, captured on Fuji X-H1 with XF 56mm F/1.2 @F/8 1/20sec ISO 200, ACROS-R JPEG
Adobe seems to have gotten their act together!? Finally … So, you may not need to get a divorce & ditch that subscription after all (they probably ain’t gonna let no-one escape anyway … ;-) Anyways, at the end of the day Photoshop and Lightroom are still the global standard when it comes down to pro digital asset management & post processing
But before discussing the cure let’s first understand the problem (for those of youse new to Fuji or contemplating joining the Fuji family). Simply put digital sensors are comprised of millions of photo sites (“pixels”) which measure the amount of light (number of photons) hitting them. To allow the camera to see the world in color the sensor is overlaid by a color filter array (CFA) of red, green and blue color filters in a distinctive repetitive arrangement, allowing the camera software to recompile the light levels into color information. This reconstructing of the full color information from the individual pixels is called “Demosaicing”. Obviously the demosaicing algorithm needs to match the arrangement of the color filters, otherwize you will not get the image you saw thru the viewfinder …
Color Filter Arrays used in digital camera sensors:
Fuji vs. the rest of the world (note the green “X” ;-)
All makers of digital cameras use a so-called “Bayer” color filter arrangement (repeating a 2 by 2 pixel pattern of 2 green, 1 red and 1 blue filters). Hang on, ALL makers of digital cameras? No. Fuji has implemented a different arrangement of color filters, repeating an alternating 3 by 3 pixel pattern of 5 green, 2 red and 2 blue filters, they call “X-Trans” (the “X” referring to the X-formed arrangement of the green photo sites)
Fuji claims this “X-Trans” arrangement delivers a more “film-like” rendering due to the less regular pattern and better performance than the Bayer arrangement, especially improving the micro-contrast due to the higher percentage of green pixels (55% vs. 50%). See here for more information. Demosaicing software optimized for the Bayer CFA layout (as used in Adobe’s Camera RAW converter at the heart of Lightroom & Photoshop CC) can cause trouble when applied to the X-Trans CFA layout, especially with small repetitive patterns, like foliage & brick structures
Now here’s the thing: I think that Fuji’s proprietary CFA layout is not even fully managed by their own in-camera demosaicing algorithm (albeit becoming visible only at more extreme magnifications). When you enlarge the below in-camera converted JPEG to a magnification corresponding to an approx. 20x30 inch / A1 size enlargement you can start to actually see the “worms”:

Fuji’s in camera JPEG conversion’s got worms!
At mural sized prints (as I do for exhibitions) you will see these painterly, wormy artefacts (see the bridge railing and the mushy area in the upper left quadrant of the above image- there should have been some branches visible there)! Don’t get me wrong - you’ll probably never have any problem with images prepared for web viewing or normal sized enlargements, using printers up to 13”x19” / A3+ size when viewing them at normal viewing distance. But for big enlargements using JPEG’s is no option anymore. For anything above 12”x17” / A3 size you gotta go RAW. Unfortunately Adobe’s Camera Raw converter don’t do much better either, see the image below - in my opinion not much different compared to the in-camera JPEG conversion:
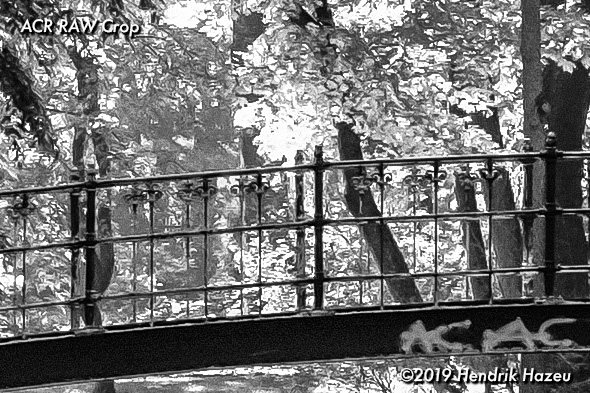
Adobe Camera RAW’s conversion also got worms!
You can see the vertical rods of the railing are partly obscured by foliage and the branches in the upper left quadrant are still not visible. Not good, I’m afraid this even happens with the sharpening settings optimized for X-Trans (low “amount” & high “detail”)! So, what to do? Apart from using external RAW converters known to work satisfactorily with the X-Trans sensor layout, like Iridient or RAW Therapee there is for me only one bit of software which has a good X-Trans demosaicing performance, while combining RAW conversion and image management (I really don’t like having to split my workflow over separate bits of software …): Capture One Pro. Let’s see how that fares:
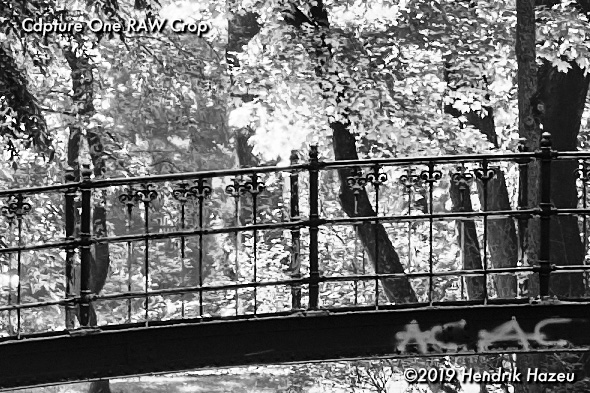
Capture One Pro. Less “wormy” but a little bit too harsh for my fancy …
From my point of view it’s better - the vertical rods of the railing are now barely visible and you can see a hint of the branches in the upper left quadrant, but the it does look somewhat harsh now (also here I used my preferred settings but left out the grain to be comparable to the other images). To be fair I’ve happily been using Capture One for a while now as my preferred “heavy duty” solution for large printing (A3+ & larger). But I gotta say I’m not completely happy with Capture One’s user interface - maybe that’s because I mainly use Fuji’s in-camera converted JPEGs (for around 90% of my work) and am therefore used to Lightroom’s interface & workflow. Using Lightroom and Capture One in parallel means that I also need to maintain 2 separate catalogues and processed image folders on my MacBook Pro. So, when Adobe released their new “Enhance Details” feature end February this I was naturally intrigued & curious if it would do better with X-Trans images! See below the result, straight outta Lightroom, using Enhance Details (this creates a DNG in the same catalogue as a new “digital negative” which can be further processed in Lightroom just like a RAW file):

Adobe Camera Raw’s new Enhance Details feature
In my opinion this is far better than the previous examples, the bridge railing and the foliage have a more natural look. And you can now see the branches in the upper left quadrant (directly below the words “Enhance Details” ;-)! For my workflow this means I can process my ACROS JPEG’s as usual and apply Enhance Details with subsequent RAW development of the DNG file for those images earmarked for big enlargement / fine-art printing. Finally Adobe seems to have listened to us Fuji photographers, the results achievable with the “Enhance Details” feature are impressive! There’s only two caveats: 1. Enhance Details needs a lot of computing power (30-40 sec on a reasonably fast 2016 MacBook Pro), so those of youse with older machines might need to go out for lunch while batch processing the results of your latest photo-shoot … ;-) 2. the Enhance Details adds a DNG file to your drive for each processed image which is approx. 50% larger (around 150MB) than an average Fuji RAW file, eating up your disk space at an alarming rate!
Here the same image as before, developed by ACR Enhance Details into a DNG and processed to taste in Lightroom:
The same image developed from the Fuji RAW file, using Adobe ACR´s Enhance Details feature!
Another example with many small details in the grass & foliage:
Contre-jour image of trees in Bayreuth’s Hof Garden, captured on XF 56mm F/1.2 R @F/5.6, 1/140 sec, 400 ISO
I hope this post was interesting for you & y’all could get something from it for your own photography. Enjoy your Sunday & wish you all the best for your photographic endeavours,
Many thanks for visiting, please leave me a comment below if you have any questions or feedback, best regards
Hendrik
If you like you can support me by sending me a small donation via PayPal.me/hendriximages ! Helps me run this site & keeps the information coming, many thanks in advance!